Editor’s intro: For patients eager to start treatment, and for orthodontists who want to maintain control over the process, in-office aligner planning can benefit everyone involved in the process.
Dr. Tim Dumore outlines the steps for an easy and efficient aligner workflow
The book, Who Moved My Cheese, by Dr. Spencer Johnson is a motivational business fable that encourages readers to acknowledge a change in their environment and learn to adapt if they wish to survive. While it was written 20 years ago, its message is more relevant than ever, and it certainly applies to our world of orthodontics. Orthodontics is currently in a time of massive change. The reality is that the ortho-dontic industry is experiencing one of the most significant paradigm shifts in its history, and I am excited to have the opportunity to participate.
When I finished my residency 20 years ago, these were the trends:
- Alginate impressions were used to make plaster casts. Intraoral scanning was still years away.
- Photos consisted of slides taken with an analog camera.
- Cephalometric and panoramic X-rays used film. Digital X-rays were just emerging, and CBCT didn’t exist in the orthodontic practice.
- Conventional brackets and bands were the orthodontic appliance of choice. Self-ligating brackets were a minor consideration, and aligners had not yet been invented.
- Websites and social media? Corporate dentistry? Direct-to-consumer aligners? They were not even on the radar.
It’s safe to say that things have changed a little since then, but the degree to which orthodontic practices have adopted these currently available technologies varies widely.
While all of these things have affected my practice, the most significant change in my clinical workflow is the incorporation of in-office fabricated aligners. I want to share with you my experience and perhaps offer some insight.
First, a little background to show you how my practice evolved into one with a strong focus on in-house aligners. Like many orthodontists, I’ve always been a bit of a sucker for technology and toys, and I’ve tried to use it to benefit the patients in my practice.
- I was an early adopter of the following:
- OrthoCAD iQ for indirect bonding
- Laser treatment
- I was the first to adopt all of the following in Canada:
- Planmeca digital ceph-Pan
- iTero®
- Objet30 Printer
And now I can add to my list of firsts to adopt in Canada — uLab Systems aligner planning software.
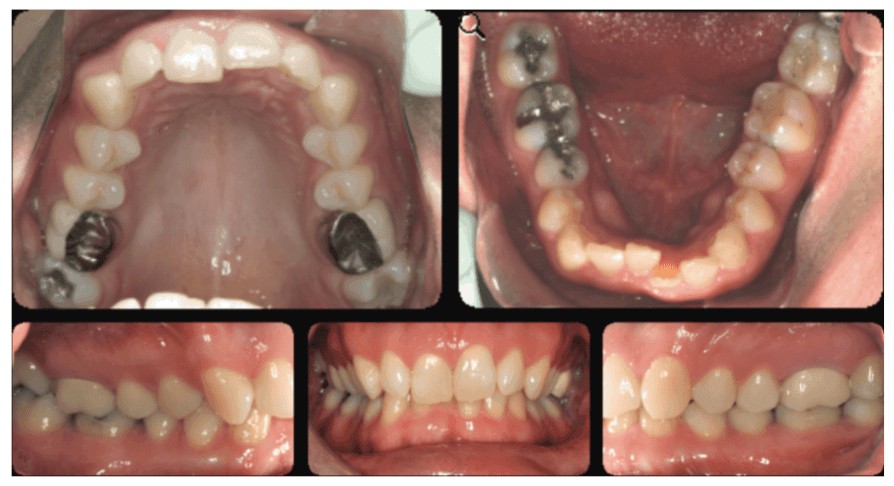
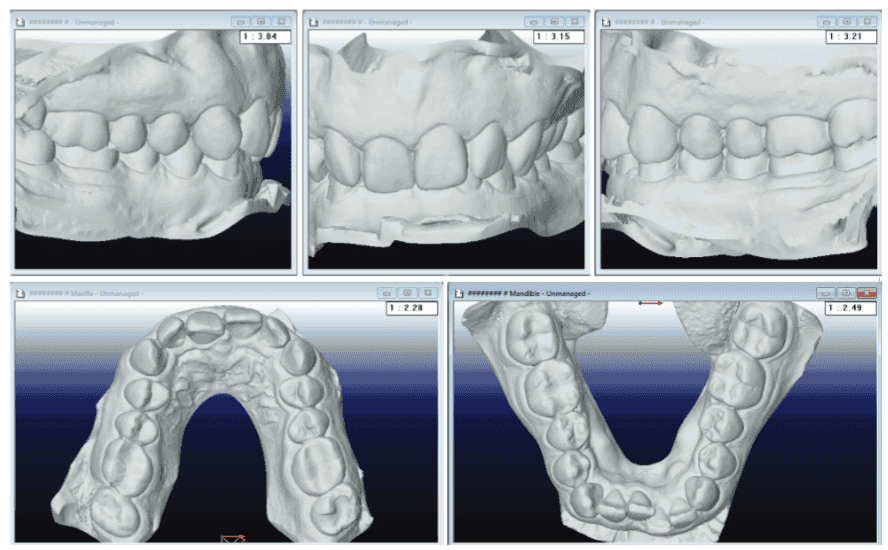
Figure 3: Pre-treatment intraoral scan occlusal views (left) and Figure 4: uLab initial occlusal views (right)What started with printing models for IDB and minor tooth movement cases has evolved to the point that all my retainers are made from printed models. Every patient is scanned pre-and post-treatment. (We have been alginate-free for almost 5 years.) Most finished cases receive a few finishing aligners, and the vast majority of our aligner treatment is done in-house. We treat the entire spectrum of aligner cases from straightforward cases with a few aligners to very challenging case treatment.
How has this benefited my practice?
Some clinicians feel that a scanner and 3D printer are too expensive or still too cutting-edge and are not comfortable being early adopters. The reality is that this technology is well past the cutting-edge and primed to advance to more of the market.
At orthodontic meetings and in ortho-dontic publications, there are many examples of doctors who have adopted this workflow and are making it work. Many practices that have switched to intraoral scanning are just using the data for diagnostic models and aligner-manufacturing submissions and are missing out on the ability to manufacture aligners in-house. Rather than submitting my scans to a company with facilities in another country, I’m more comfortable knowing that the work is kept on home soil, in my office. Other workflow concepts often require multiple time inputs between the dentist and the aligner manufacturing company, and that workflow consumes many hours of doctor time each week. However, when creating aligners, I’ve found that a software program called uLab Systems has simplified my in-house aligner process. In fact, I would say this software program saves me a significant amount of time versus my previous more manual method of piecing together multiple software programs. Once I have finished planning using this technology, I can immediately begin the aligner fabrication process. In my practice, I use uLab for full cases and also for finishing hybrid or combination treatment where I switch between braces and aligners (or vice versa), Phase I treatment, and relapse cases.
The essential workflow is to scan the patient, use that data to plan the aligner treatment plan, print the models, and then use the models to thermoform and produce the aligners. I’ll go through each of these steps.
Scan
According to an informal survey conducted the by the Journal of Clinical Orthodontics, 62% of respondents indicated they now use an intraoral scanner. The speed of scanning has increased such that it can be faster than taking alginate impressions once the time of prep and cleanup is factored in, and the majority of patients prefer being scanned to having a tray of alginate stuffed in their mouth for 2 minutes. In the world of Who Moved My Cheese, alginate is that hunk of moldy cheddar that has been forgotten at the back of the fridge! Some doctors worry about the cost and learning curve of transitioning to intraoral scanning, but those are minimal obstacles. At the very least, an intraoral scanner is the entry point for in-house aligners.
The question of which scanner to buy is indeed relevant, but most aligner programming software will accept any STL (the output file type of most scanners). Once the patient is scanned, I get that data from the scanning software and transfer it to the program that I will use for designing my virtual treatment. The raw scans on the scanning monitor look pretty, but in fact, typically require a significant amount of “cleanup” before they can be used in another program. Just like plaster needs to be trimmed after pouring, the data needs to be trimmed as well. This process can be cumbersome. I find uLab’s software simplifies the process as it is done automatically and takes just seconds. Once the data is in the programming software, additional work is needed to help the program identify the teeth, along with tooth anatomy landmarks that will be referenced for tooth movement. A great strength of this software program is the speed and ease with which it takes the raw data and gets it to the point where the doctor can begin planning tooth movement.
Figure 5A: Model trimming with uLab (left) and Figure 5B: Model segmenting with uLab (right) Figure 6A: Choosing the setup with uLab (left) and Figure 6B: Adding Attachments with uLab (right)Keep in mind, all of the work done up to this point has been completed by one of my team members, so it hasn’t cost any of my valuable time. Do note, however, that operating a scanner does have some cost beyond the purchase price of the unit. Typically, there are monthly fees as well as consumables such as scanner sleeves. However, the switch to intraoral scanning has been cost-effective and efficient in my practice.
Plan
With the virtual models prepared, I am ready to program tooth movements. For years this has been the missing puzzle piece. How can I create an end-to-end aligner movement plan on my own? A clean version of the software that did it all didn’t exist. uLab makes this process easy for the doctor. A “pre-setup” function generates an initial aligner plan that I can assess and adjust using uLab’s intuitive adjustment tools until the movement sequencing and final occlusion are visualized. With the program’s built-in artificial intelligence, the quality of the preset up will continue to improve with time.
The program does allow for IPR and attachment placement at the orthodontist’s discretion as well as staging and rates of tooth movement. In my practice, simple cases where I’m programming two to four aligners at debonding might take a minute or two of my time while the most complex cases might take 10 minutes or so. Either way, once I’m done, I’m done, and I won’t need to think about that case again until I see the patients in the chair to check their aligners.
There may be some fear about the difficulty of creating one’s own aligner treatment plans, but clinicians who have experience with aligners in general have the background to plan treatment cases on their own. Dentists can also increase their knowledge base in the following ways:
- Attending in-office courses (Drs. Ed Lin, Jason Cope, Bill Laymen, and David Kemp)
- Signing up for the excellent online course such as Aligner Fellowship by Drs. Jonathan Nicozisis and Maz Moshiri
- Purchasing great books such as Clear Aligner Technique by Dr. Sandra Tai and Insider’s Guide to Invisalign Treatment by Dr. Barry Glaser
- Joining many great Facebook groups such as the Ortho 3D Aligner Study Group where dentists can learn and ask questions from others with experience and new users as well who likely have the same question.
Print models
Once I have programmed my virtual aligner stages, I turn it into reality. The individual model files need to be prepared for printing, including labeling the stage number on the model and patient information on the model base. Additionally, the models need to be organized so that the printer can print to its capacity. This can be a very time-consuming process with some programs. Thankfully, uLab does this all automatically in seconds.
It is possible to send these print files to an outside lab, and that may be a good option for some practices. However, the benefit of having my own 3D printer as part of my in-house lab is enormous. The cost of 3D printers used in orthodontics has come down significantly while the capability has steadily increased so that owning a 3D printer is a very reasonable option.
For this process, I dedicated some space in my existing lab for the printer and post-processing.
Create aligners
Once I have printed the models, it is simply a matter of thermoforming plastic over the models, then trimming and polishing them. This necessitates a good quality thermoforming machine such as the Biostar® or Drufomat, along with an electric lab handpiece. uLab has a trimming tool called the uContour that uses a trim line generated within the software to automatically trim the aligners as fast or faster than a human without the physical wear and tear on the lab technicians’ body. The next version of the uContour that is in development will allow the clinician to load at least 12 models at once so that the technician can perform other duties while the machine works.
Another consideration is what material to use for the aligners. There are a number of excellent quality materials available on the market that effectively move teeth for a dollar or two per sheet.
Packaging and branding
For years, we packaged our finished aligners in Ziploc® bags and used DYMO labels to identify the individual packages but realized that the quality of the packaging should reflect the quality of our product. Professionally produced packaging is in-expensive and allows me to deliver the aligners with my own practice branding.
Turnkey
This hopefully reinforces what those who are already producing aligners in-house have done in practice. To help those who are new to this concept, uLab is breaking down the entire process from start to finish and developing a turnkey model that will guide the clinician through the process of integrating in-house aligner treatment.
The key to it all, in my opinion, is keeping your aligner manufacturing in-house to reduce turnaround time and cost. For patients who are eager to begin treatment, same-day starts can become a reality. By taking control of the entire process, my colleagues can gain the ability to do what’s best for their patients and practice, just as I have. To go back to my earlier reference of Who Moved My Cheese, you have a choice between having stale cheese (or losing all your cheese?) or brand-new cheese for years to come!
3M announced its exclusive North American license of uLab System’s treatment planning software for in-office aligner planning – further providing choice and flexibility for orthodontists. Read more about this exciting capability!
Stay Relevant With Orthodontic Practice US
Join our email list for CE courses and webinars, articles and mores
